Google Ads — manual setup
Google Ads is the most setup-heavy of the four destinations. The credentials are OAuth-only (no manual token paste path), but the per-conversion-action mapping needs a fair bit of clicking around in the Google Ads dashboard.
Test Account mode — server uploads succeed only against test accounts, not production. Apply for Basic Access at Google Ads → Tools → API Center (1-3 days, sometimes longer). While waiting, AdsPing falls back to the browser-side gtag tag which works immediately. See the Basic Access section below for the application content.Before you start
- You need a Google Ads account with at least one conversion action. If you're just creating everything for the first time, set up the conversion action FIRST (Tools → Conversions → + New conversion action) — AdsPing can't create it for you, just forward to it.
- Your Google account needs Admin or Standard access on the Google Ads account. Read-only or email-only access is insufficient. Check at Tools → Access and security in Google Ads.
- Manager (MCC) accounts: if your account is an MCC, AdsPing connects to the MCC and lets you pick which sub- account to forward conversions to. The conversion actions themselves still live on the sub-account.
Create a conversion action (full wizard)
If you don't already have the conversion action you want AdsPing to fire (Lead, Purchase, PhoneCall, etc.), create it first inside Google Ads. AdsPing forwards events to existing actions — it can't create them via API. The walkthrough below uses a phone-call conversion as the example, which is the trickiest type to get right; the same steps apply to website conversions (just simpler — fewer screens).
gtag event snippet on your website — not Google's call-forwarding numbers. AdsPing fires the snippet's event from pb.js when a visitor clicks a tel: link. Call-forwarding conversions are tracked by Google directly and can't be integrated with AdsPing.Step 1 — Pick data sources
Open ads.google.com → Tools → Conversions → + New conversion action. The first screen asks which data sources you want to track. Tick the boxes for what applies to your site:
- Conversions on the website — purchases, leads, sign-ups, add-to-cart. Required for any standard ecommerce or lead-gen flow.
- Conversions obtained from phone calls — only if you want to track phone clicks AND you have a phone number on the site.
- Leave Transformations in practice (mobile app) and Offline conversions unchecked unless you specifically need them — they don't flow through AdsPing.
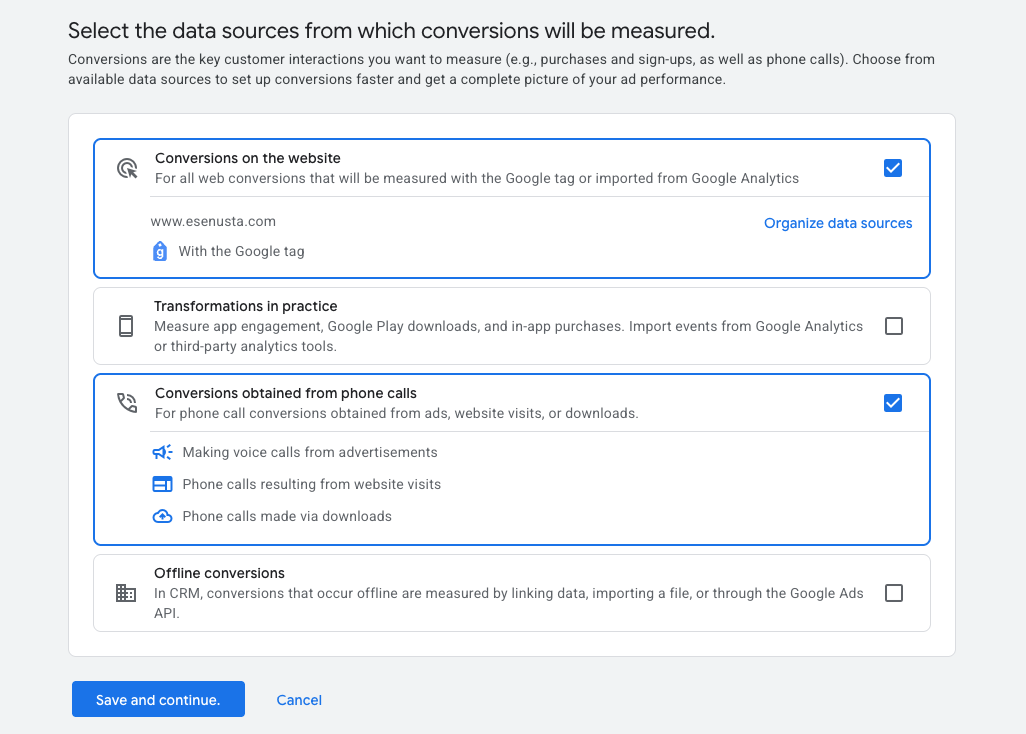
Click Save and continue.
Step 2 — Define the conversion action
The next screen asks for the conversion action's details. Typical settings for a phone-call action:
- Goal: Lead → Potential customer obtained through phone call
- Source: Website (clicks on a phone number on the site)
- Value: "Use a single value" → enter a reasonable per-call value. For optimisation to work well, this should reflect the actual margin a call brings on average (e.g.
50 TRYfor a service business where 1 in 4 calls converts and average ticket is200 TRY). - Counting: One conversion per click (avoids double-counting the same caller).
- Click-through window: 30 days is the default and works for most B2C funnels.
Step 3 — Grab the event snippet
After saving, Google shows a 3-step summary. Click Show the event snippet on the conversion row to reveal the gtag snippet:
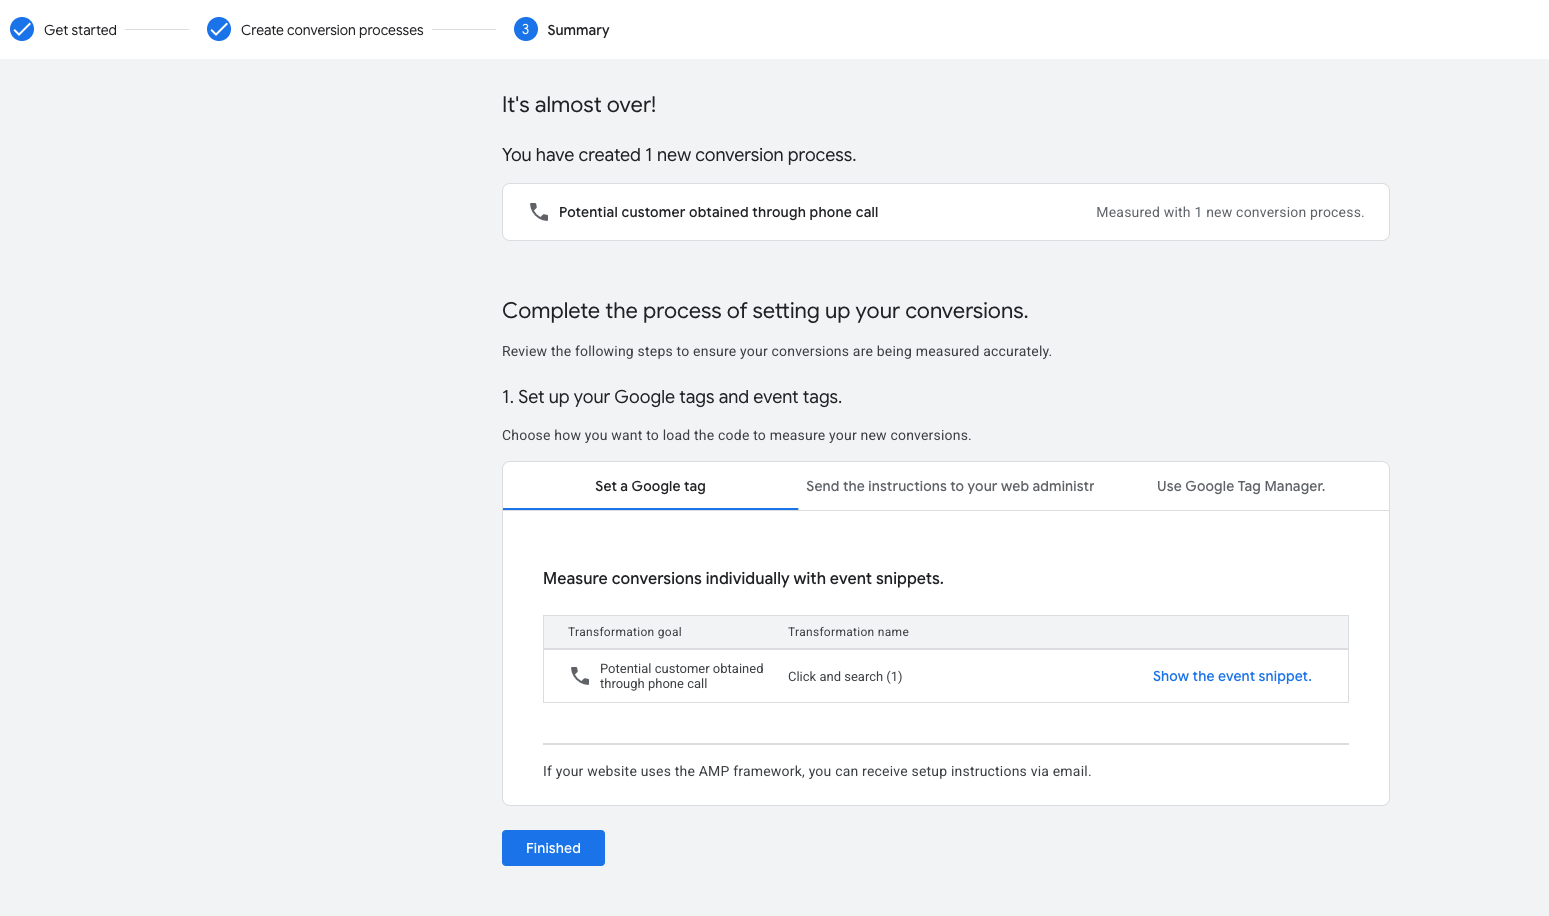
The snippet looks like this:
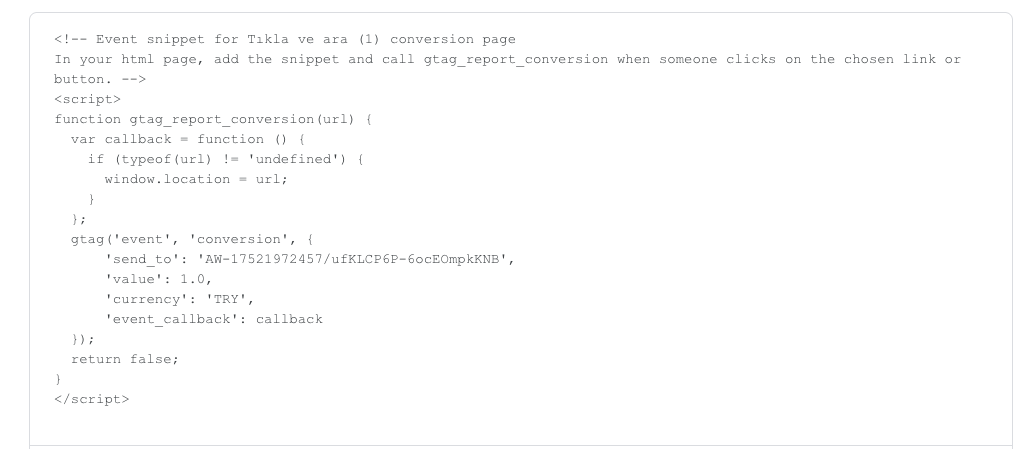
The only two values AdsPing needs from this snippet are inside the send_to string. It's always formatted as AW-ConversionId/ConversionLabel. For the example above:
'send_to': 'AW-17521972457/ufKLCP6P-6ocEOmpkKNB'
              └─────┬─────┘ └────────┬────────┘
ID LABEL- Conversion ID =
AW-17521972457(account-level — same prefix for every action on this Google Ads account) - Conversion Label =
ufKLCP6P-6ocEOmpkKNB(action-specific — different for every conversion action)
Note:Don't copy the value, currency, or event_callback from this snippet — AdsPing fills those in from each event's own data (e.g. the value comes from pbq('track', 'Purchase', { value: 199.90, currency: 'TRY' })).
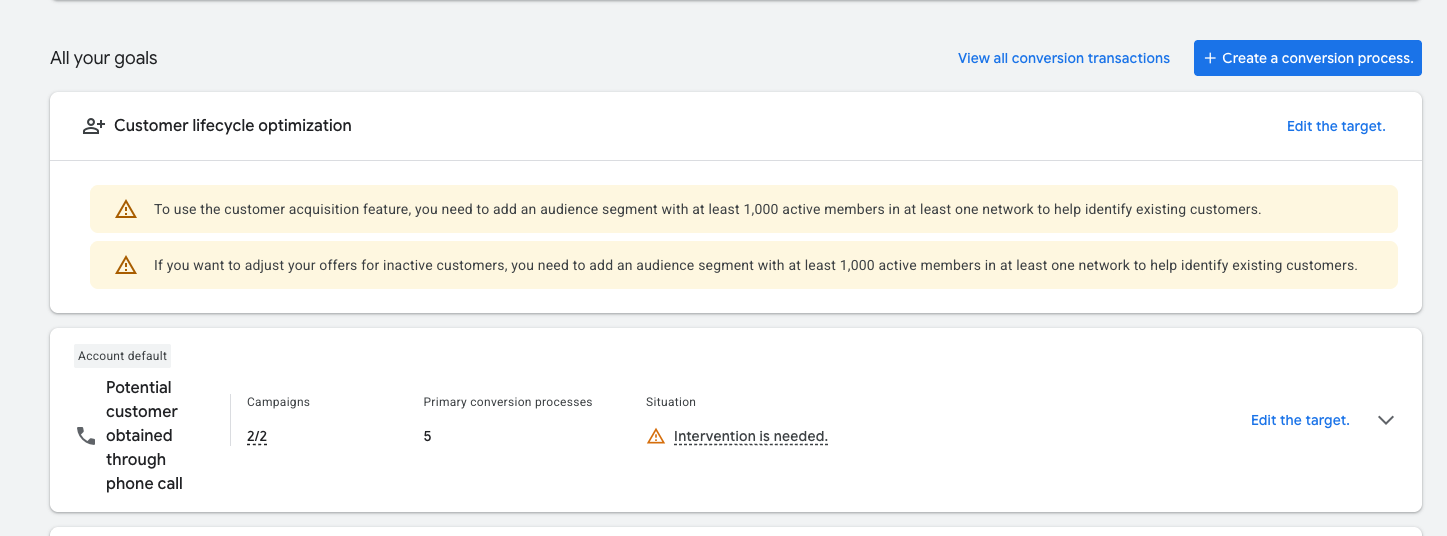
Step 4 — Verify the action appears under Goals
Once the wizard finishes, the new action shows up under Goals with a status badge. A brand-new action usually says "Intervention is needed" for the first 24-48 hours — that's Google waiting for the first conversion data to come in. It clears automatically once events start flowing.
Step 5 — Wire the action into AdsPing
With Conversion ID and Conversion Label in hand, open the pixel in AdsPing → Destinations → Google Ads card → + Add action (or Manage → Edit on an existing pipeline) and fill in:
- Name: something descriptive — e.g. "Phone click — Acme"
- Conversion Action ID: from the URL of the action's detail page (see Step 2 below for how to find it)
- gtag Conversion Label: the label string from the snippet (e.g.
ufKLCP6P-6ocEOmpkKNB) - Event name filter: the pb.js event name that should fire this conversion —
PhoneCallfor phone clicks,Purchasefor ecommerce, etc.
<a href="tel:..."> link on the merchant's site, pb.js fires pbq('track', 'PhoneCall')without the merchant writing any code. The pipeline routes it to the matching Google Ads action via the label you configured. No manual onclick handler needed.Connect Google Ads (OAuth)
Pixel detail → Google Ads card → Connect Google Ads. One consent screen grants AdsPing read access to GA4 properties + GTM containers + Google Ads customers.
Google Ads
Server-side conversion forwarding via Google Ads API
Connect your Google account. We'll list your accessible Google Ads customers + GA4 properties + GTM containers in one OAuth round-trip. Subsequent destinations (GA4, GTM) reuse the same OAuth credentials.
You'll be redirected to Google's consent screen. Three scopes are requested:
https://www.googleapis.com/auth/adwords— Google Ads API access (uploadClickConversions, listAccessibleCustomers, googleAds:search).https://www.googleapis.com/auth/analytics.readonly— GA4 property listing.https://www.googleapis.com/auth/tagmanager.readonly— GTM container listing.
Accept all three. After consent, Google redirects back to AdsPing and the Google Ads card flips to "Set up first conversion action".
Google OAuth consent screen showing AdsPing requesting access
Capture Google's standard OAuth consent screen showing the three scopes AdsPing requests. Helps users feel confident about what permissions they're granting.
Note:The scope list looks broad ("view your Google Ads campaigns" etc.) because Google's scope vocabulary doesn't have a fine-grained "upload conversions only" option. AdsPing only ever calls uploadClickConversions + read-only methods — never modifies campaigns, budgets, or targeting.
Find your Conversion Action ID
Unlike Meta and TikTok where you copy a single Pixel ID, Google Ads requires you to map each conversion action separately. The action ID is a numeric value hidden in the URL — Google's UI doesn't surface it directly.
Open ads.google.com → top nav Tools → Conversions. Click the conversion action you want to wire up (or create one — recommended Goal: "Submit lead form" for lead-gen, "Purchase" for ecommerce, Source: Website).
Conversions
All conversion actions on this account
Lead — Acme Inc Form
Category: Lead · Counting: One · Status: Active
Purchase — Acme Inc Order
Category: Purchase · Counting: Every · Status: Active
Once you click into the action detail, look at the URL:
↑ Look at the URL bar above
https://ads.google.com/aw/conversions/customers/3884688380/detail?ctId=987654321- 3884688380 = your Customer ID. AdsPing pre-fills this from OAuth — you don't need to copy it.
- 987654321 = your Conversion Action ID. The number after
ctId=. This is the value to copy into AdsPing.
Lead — Acme Inc Form
ID: 987654321 · Created 2 weeks ago
Category
Lead
Counting
One
Conversion window
90 days
Google Ads conversion action detail page with URL highlighted
Capture the address bar AND the page header so users can match what they see. The ctId in the URL is the key value — annotate or arrow it.
Note:Customer ID can be displayed in two formats: 3884688380 (10 digits, no dashes) or 388-468-8380 (with dashes). AdsPing accepts both. Conversion Action ID is always plain digits.
Set up first conversion action in AdsPing
Pixel detail → Google Ads card → Set up first conversion action. The customer ID and OAuth tokens are pre-filled from the consent step — you only fill the action-specific values.
Set up Google Ads conversion
Map your first conversion action — subsequent actions reuse the customer
Auto-detected from OAuth — pick the right one if you have multiple
From the URL ctId= (step 2 above)
Which AdsPing event triggers this conversion to fire
Optional but recommended — see step 4 for where to find this
Per-action 22-char label (also from step 4)
On Save, AdsPing creates a pipeline tied to this conversion action. The pipeline filters by event name — only Lead events from pb.js will trigger this Google Ads upload. Other events (Purchase, ViewContent, …) won't go to Google Ads unless you add another pipeline mapping them.
Note:The "Maps to pb.js event" picker offers common standard names. For custom events not on the list, type the name directly (e.g. WhatsAppClick). AdsPing accepts any string — must just match what your pb.js code or auto-tracker fires.
Find gtag fallback values (recommended)
While Basic Access is pending, browser-side gtag is the only way to fire Google Ads conversions. Both AdsPing's server upload and the gtag tag can coexist — Google deduplicates by gclid.
Same Conversion Action detail page → switch to the Tag setup tab → pick "Install the tag yourself". Google shows a full snippet — the two values you need are inside it.
Lead — Acme Inc Form
Install the tag yourself
Install the conversion event snippet on your site
<!-- Event snippet for Lead - Acme Inc Form conversion page -->
<script>
  gtag('event', 'conversion', {
      'send_to': 'AW-12345678/AbCDe1FgHIjKlMnoPq',
      'value': 1.0,
      'currency': 'USD'
  });
</script>
gtag Conversion ID
AW-12345678
Shared across all conversion actions in this Google Ads account. Will be the same when you add other actions.
gtag Conversion Label
AbCDe1FgHIjKlMnoPq
Different for every action. Identifies which conversion this fire counts as.
Paste both values into the AdsPing dialog (step 3 — gtag fields). Save. From then on, pb.js will:
- Load
googletagmanager.com/gtag/js?id=AW-12345678on visitors' sessions. - When a matching pb.js event fires (e.g.
Lead), also firegtag('event', 'conversion', {send_to: 'AW-12345678/AbCDe1FgHIjKlMnoPq' })from the browser. - Simultaneously try the server-side upload via Conversions API. If Basic Access is still pending, the API rejects with
TEST_ACCOUNT— that's expected; the gtag fire already counted the conversion.
gclid + within ~24 hours. AdsPing's pipeline handles both legs automatically.Add more conversion actions
Each conversion action = one pipeline. Lead-gen sites typically have 2-4 (Lead, AppointmentRequest, WhatsAppClick), ecommerce typically has 3-5 (ViewContent, AddToCart, InitiateCheckout, Purchase).
Pixel detail → Google Ads card → + Add action. The dialog opens with the customer ID + OAuth tokens + gtag Conversion ID pre-filled from the first pipeline — you only fill in the new Conversion Action ID, the new pb.js event, and the new gtag Conversion Label.
Google Ads — 3 actions configured
One pipeline per Google Ads conversion action
LeadAppointmentRequestWhatsAppClickNote:For agencies running multi-brand setups: the Customer ID in the add-action dialog is editable. If you connect a parent MCC account via OAuth, you can map different actions on the same pixel to different sub-accounts. Common pattern: one AdsPing pixel per merchant domain, with Google Ads pipelines pointing at the merchant's own Google Ads sub-account under your MCC.
Basic Access — when, why, how
Google's Conversions API requires your developer token to graduate from Test Account mode (default) to Basic Access. Until graduated, server uploads return UNAUTHENTICATED: token does not have valid permissions for production accounts for any non-test customer.
How to apply
- Google Ads → Tools → API Center.
- Click Apply for Basic Access.
- Fill the form:
- Tool name: AdsPing (or your white-label name).
- Tool URL: https://adsping.io.
- Customer use case: Server-side conversion forwarding for advertisers using AdsPing pixel tracking. We upload click conversions on behalf of the advertiser via the Conversions API after pb.js captures the event in the browser.
- Read or read+write: Read+write (we call
uploadClickConversions). - API methods used:
customers:listAccessibleCustomers,googleAds:search,customers:uploadClickConversions.
- Submit. Google reviews 1-3 business days, sometimes longer.
While waiting
gtag fallback (step 4) covers conversions during this period. Match rate is lower than server-side but adequate. Set up gtag values for every conversion action so nothing is dropped.
After approval
Server-side uploads start working immediately — no AdsPing config change needed. The gtag fallback continues to fire alongside; Google deduplicates the two via gclid. If you want pure server-side after approval, clear the gtag Conversion ID + Label on each pipeline.
Common issues
UNAUTHENTICATED: …token does not have valid permissions…
Basic Access is still pending or your developer token was revoked. Apply (or re-apply) at the API Center. While waiting, gtag fallback keeps conversions flowing.
INVALID_ARGUMENT: gclid is required
Server uploads need either a Google click ID (gclid), an iOS app click ID (gbraid), or an Android one (wbraid). pb.js captures all three from URL params and stores in a first-party cookie. Visitors arriving without a Google ad click won't have any of these — that's expected; AdsPing skips the upload silently for those events. Only Google ad clickers count toward Google attribution anyway.
DUPLICATE_CONVERSION_IN_REQUEST
Two pipelines on the same pixel both forward the same event to the same conversion action. Edit one of them — change either the pb.js event filter or the Conversion Action ID so they don't collide.
DEVELOPER_TOKEN_NOT_APPROVED or unexpected behavior across customers
Basic Access on a developer token works only for accounts you directly manage. If your token is approved but you're trying to upload conversions for a customer that hasn't linked your manager account, Google rejects. Either: (a) the customer links your MCC, or (b) the customer applies for Basic Access on their own developer token and shares it with you.
Next
- Google Ads concepts — multi-action design + match rate tradeoffs.
- Diagnostics — Google Ads doesn't have Test Events; here's the next- best verification path.